


Plamax at Nerdbutiken.se – your guide to smart building and a neat finish
Do you want a model that feels display-ready straight out of the box, but still offers that real joy of building? Plamax has become a clear choice for Swedish hobby builders thanks to its snap-fit/glue-free construction, color-separated parts, and poseable joints – perfect when you want to build mecha or character models without getting stuck with glue and putty.
In this guide, we'll go through how to choose the right Plamax kit based on skill level, scale, and build time, what tools and accessories actually make a difference (panel lining, decals, topcoat), and how to avoid common mistakes like nub marks and "silvering" decals. You'll also get concrete buying advice on why Nerdbutiken.se is a reliable choice in Sweden – with clear stock status, prices in SEK, and smoother deliveries than importing.
Plamax is a product line of plastic models of characters and mecha that focuses on building enjoyment, sharp detailing, and poseability. For many hobby builders, this is the "sweet spot": you get the feeling of creating something yourself, but without the steep learning curve that classic glue and putty projects can involve. The result is often a model that looks really good straight out of the box – while still being able to be elevated several levels with simple techniques like panel lining and topcoat.
What differentiates Plamax from classic plastic models
Plamax kits are often designed to be as user-friendly as possible, yet still provide a premium impression:
-
Snap-fit and well-thought-out fit: Parts click together with precision, reducing the need for glue and making building more accessible.
-
Color-separated parts: Smart division into different plastic colors means the model can be display-ready without painting, especially for beginners.
-
Movable joints and poseability: Many Plamax models are built for dynamic poses, which suits both display cabinets and photography.
-
Detailing that withstands close-ups: Sharp panel lines and surface details mean that even a simple finish (e.g., panel line + matte topcoat) has a great effect.
Unique insight: Plamax is also "gratifying" for those who want to build often. Since the basic result looks good quickly, you can put your energy into what you enjoy most – finessing, posing, photography, or small upgrades – instead of getting bogged down in groundwork.
Applications: from collecting to custom builds
Plamax suits several types of hobbyists:
-
Collectors who want built models with a personal touch, not just ready-made statues.
-
Diorama and photo builders who want to be able to pose and light the character freely.
-
Custom builders who experiment with painting, weathering, and kitbashing.
The "custom-built collector's value" is a large part of its popularity: the building process becomes part of the ownership. A Plamax on the shelf is not just a figure – it's a project you've actually made yourself.
Why Swedish builders buy Plamax at Nerdbutiken.se (selection, security, and delivery)
When you want to buy Plamax in Sweden, it's rarely the kit itself that's the biggest question mark – but everything around it: stock status, delivery time, price in SEK, and whether you risk customs/VAT and complicated returns when importing. This is where Nerdbutiken.se becomes relevant for many hobby builders, as you shop through a Swedish e-commerce with clear product info and a smoother purchasing experience from click to build table.
Selection and product information that makes choosing easier
A big advantage is that you can navigate directly to the Plamax category and at the same time get an overview of related model kits and accessories. To choose faster, pay particular attention to:
-
Clear product images and descriptions: helps you see the level of detail, articulation, and what is actually included (weapons, faces, extra hands, stands, etc.)
-
Recommended accessories: when the store shows suitable tools, panel lining, and topcoat, you save time and avoid the "missing-one-thing" pause in the middle of building
-
New releases and related series: good if you want to follow releases, compare similar kits, or find your next project once you've fallen for the Plamax feel
What is often missing in many guides is how much clear product information affects the end result: the better you understand what the kit requires (e.g., type of decals and number of small parts), the more you can plan build time and tools – and reduce the risk of buying the wrong thing.
Delivery, stock status, and a "smart purchase" checklist
At Nerdbutiken.se, it's also valuable to correctly interpret the stock status:
-
In stock: suitable when you want to get started immediately and avoid uncertain waiting
-
Pre-order: best when you want to secure popular releases that otherwise sell out quickly
-
Backordered: signals that you should monitor or choose alternatives if you have a deadline (e.g., a gift)
Smart purchase checklist: monitor upcoming releases, combine shipping with tools/stands at the same time, and time pre-orders so you avoid multiple small orders. This often provides both better control and more value for money.
Section 3: Guide to choosing the right Plamax kit – difficulty level, scale, and build time
Choosing the right Plamax kit is less about "which one looks coolest" and more about matching difficulty level, size/scale, and how much time you actually have. Many top-ranked guides highlight that snap-fit makes the threshold low – but that part count, small details, and decals can quickly make a kit more advanced than one might think. Here's a practical way to choose smartly, especially if you're shopping via Nerdbutiken.se and want to get the right model from the start.
How to assess build level: beginner vs. experienced builder
-
Part count and small details: More, smaller parts usually mean a higher difficulty level (and more time with nub marks/sanding). Look for kits described as "easy" or with fewer runners if you're new.
-
Joint construction and poseability: Poseable mecha/characters often have more movable joints, which can mean tighter fits and more instances where you need to dry-fit.
-
Decals: A lot of marking can be "the real challenge." If you want to avoid fiddling, choose kits with more color-separated parts and fewer decals – or plan to start with stickers before moving on to waterslides.
A good rule of thumb: if you want a quick win the first time, choose a kit that feels "display-ready" straight out of the box and save the most detailed builds for when you've gotten into a routine with cutting/sanding and assembly.
Scale, build time, and "matching the kit to your lifestyle"
Top lists often talk about scale based on detail, but miss the everyday aspect. Think of it this way:
-
Smaller kits: Often faster to build and easier to fit on a shelf/display case – perfect as a weekend project.
-
Larger kits: More presence and detail, but expect extra time for finishing (panel lining, decals, topcoat) and more display space.
-
Realistic times: Basic construction can be quick, but add time for panel lining, decal application, and topcoat if you want a "pro look."
So, choose according to your rhythm: the commuter builder needs a kit that can be paused, while someone who enjoys long builds will get more out of larger, more complex Plamax models.
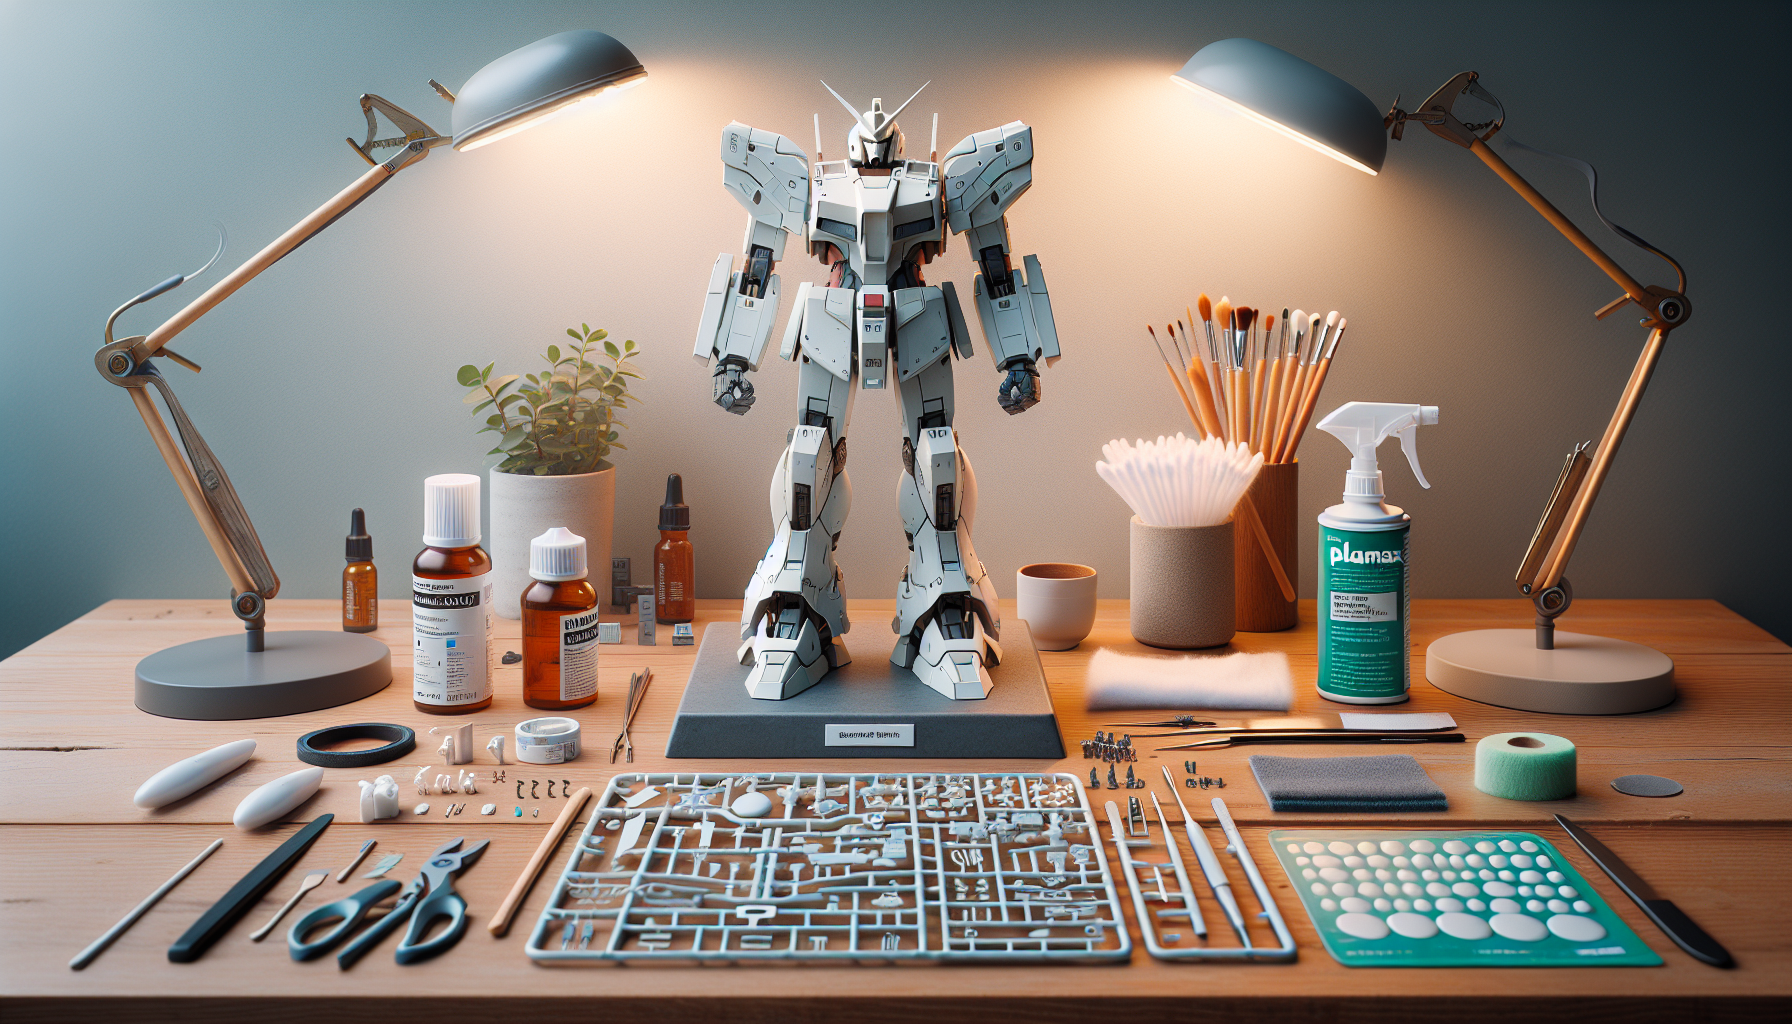
Tools, accessories, and upgrades – what you should buy at the same time at Nerdbutiken.se
A Plamax kit can often be built completely without glue, but the right tools make an enormous difference to the final result. Top-ranked guides usually highlight nippers and hobby knives as "must-haves" – but often miss how you can plan your purchases to both save money and get a model that looks "store-finished" right away. When you're already ordering Plamax from Nerdbutiken.se, it's smart to add a few carefully selected accessories that elevate the finish more than they cost.
Basic equipment that provides a cleaner build (without frustration)
-
Nippers: Preferably choose ones designed for plastic models for cleaner cuts and less risk of white stress marks.
-
Hobby knife + extra blades: To remove remnants of the sprue ("nub") after the initial cut and access tight corners.
-
Sanding sticks/sandpaper (various grits): A combination of, for example, coarse → fine provides smooth surfaces without rounding off sharp edges.
-
Tweezers: Helpful for small parts and decals – especially on mecha details and faces/visors.
This is the foundation that ensures parts truly "lock" as they should in snap-fit construction, and reduces the risk of forcing connections and creating tension in the plastic.
Finish & upgrades that make the model "display-ready"
-
Panel lining pen or wash: Quickly enhances panels and mechanical lines; one of the most cost-effective upgrades for Plamax.
-
Topcoat (matte/gloss): Seals decals and evens out the plastic's sheen. Matte often gives a more realistic impression on mecha, while gloss can suit visors/effect parts.
-
Decals: stickers vs. waterslides: Stickers are fastest; waterslides give a thinner, more painted look but require a bit more technique and preferably a topcoat afterwards.
-
Stand + base: Makes poses more stable and takes photos to the next level, especially for dynamic action poses.
Unique recommendation: start with a minimum package (nippers, knife, 2–3 sanding grits, panel liner). Once you've built a kit and know you're hooked on the hobby, upgrade to the pro package (topcoat, waterslides, tweezers, stand). This way, you shop smartly at Nerdbutiken.se without over-investing from the start.
Step-by-step building tips – how to get a professional Plamax finish without getting stuck
Plamax is often "build & display"-friendly straight out of the box, but the biggest differences in the final result come from small, consistent habits: preparation, clean cuts, and the correct order of finishing. Here's a practical process that minimizes common beginner problems like visible nub marks, ill-fitting joints, and "silvering" decals.
A simple workflow that always works
-
Prepare your workspace: Clip off runners in logical order and place parts in small bowls/bags by body part (arms, legs, head). This saves time and reduces the risk of mixing up mirrored parts.
-
Read the manual – and dry-fit: Especially around shoulders/hips where joint construction can be tight. Dry-fitting helps you see where nubs might be visible in the final pose.
-
Clean cuts against the nub: First cut a bit away from the part, then cut close, and finish with a hobby knife + sanding stick. The goal is to avoid "stress marks" (white marks) in the plastic.
-
Test articulation before "locking": Assemble a joint, move it through its full range of motion, and check that nothing is catching. Plamax parts are often precision molded – never force a fit.
-
Finish in the correct order: panel line → decals → topcoat. Topcoat (matte/gloss) evens out the overall look and protects decals and panel lining.
When building Plamax without painting, it's precisely panel lining and a good topcoat that provide the most "bang for the buck." An extra tip rarely mentioned: photograph the model under strong side lighting before topcoat – then any remaining nubs and scratches will be immediately visible, and you can fix them before everything is sealed.
Troubleshooting: if X happens, do Y
If decals silver → apply them to a glossy surface (or gloss topcoat), use decal softener, and seal afterwards.
If panel wash becomes messy → let it dry longer, gently clean with a slightly moistened cotton swab, and work in small areas.
If joints become loose → build up friction with a very thin topcoat/clear on a ball joint or use joint strengtheners; let dry completely before assembly.
With this routine, you'll get a stable, clean, and "display-ready" Plamax that looks professional – without the project dragging on.
Plamax for collectors and custom builders – painting, weathering, and personal builds
One of the great strengths of Plamax is that the kits often look "finished" right out of the box thanks to color-separated parts and sharp detailing. But for collectors and those who enjoy creating something unique, there's a second level: with simple techniques, you can elevate an already display-worthy model into a truly personal centerpiece – without needing to be an airbrush pro from day one.
When painting makes the biggest difference (without being overwhelming)
-
Color correction and small details: Pick out vents, cables, sensors, and the insides of thrusters with a brush – this gives maximum effect with minimal time investment.
-
Shading and highlights: A thin wash in panels and light drybrushing on edges creates depth, especially on mecha details and "hard" armor.
-
Metallic effects: Paint moving parts, pistons, and weapons in metallic tones for a more realistic impression (and to break up large surfaces).
A smart approach that many miss is to start "semi-custom": keep the base plastic, but do panel lining + detail painting + topcoat. You get a clearly upgraded finish, but avoid full masking and total repainting. If you want to go further later, it's easy to build on with more advanced painting, weathering, and modifications.
Weathering, kitbashing, and Nordic "Swedish aesthetic"
For dioramas and photography, weathering is often what makes the model feel like part of a world, not just an ornament. Try chipping on exposed edges, pigments around feet/landing surfaces, and a controlled filter-wash to "dull" the plastic feel.
If you want to stand out in the feed: build a Nordic base with a winter effect (snow, slush, ice), a neutral grey industrial look, or a forest road with rusty sheets – it suits Plamax mecha unexpectedly well and provides a strong visual theme. For kitbashing and 3D-printed parts: consider scale, attachment points, and durability (heavy additions may require reinforced joints or stands).
Buying advice and SEO-friendly FAQ: price, pre-orders, and smart choices of Plamax at Nerdbutiken.se
When you're buying Plamax at Nerdbutiken.se, it's rarely the "click to buy" step that's difficult – it's choosing the right kit, timing releases, and getting the best value without unnecessary extra costs. Top-ranked guides often highlight price, difficulty, and tools as crucial factors; here we compile everything into concrete buying advice, plus a quick FAQ that answers the most common questions Swedish builders Google.
Pricing: what you're actually paying for
-
Size, part count, and construction: more parts, more inner-frame-like solutions, and advanced joints often drive up the price – but also provide more poseability and detail.
-
License and design: popular characters/series and newer releases tend to cost more and sell out faster.
-
Accessories that "make a difference": expect that a simple finish (e.g., panel lining + topcoat) often provides the greatest quality boost per krona, especially on color-separated snap-fit kits.
A practical way to think is "total build": kit + basic tools + decals/topcoat. This makes it easier to compare two Plamax kits that look similar on paper but require different amounts of post-processing to reach the same display level.
Pre-order, stock status, and decision tree (quick guide)
Plamax releases can go quickly, so pre-ordering is often the safest way to secure a copy – especially if you want to build a specific character or match a collection. Keep an eye on Nerdbutiken's status: in stock (fast delivery), pre-order (reserve before release), and backordered (uncertain time).
- If you want the newest release → choose pre-order early and monitor the release date
- If you want the most value for money → choose a kit in stock and allocate budget for panel line + topcoat
- If it's a gift → choose a "quick win": color-separated kit + nippers + sanding sticks in the same order
FAQ: common questions about Plamax (and the answers)
Do I need glue for Plamax?
Usually no – many Plamax are snap-fit. However, glue can be useful for small details or if you want to permanently lock a part.
Which tools are most important for a beginner?
Minimum level: nippers, hobby knife, and sanding sticks/sandpaper. That goes a long way for a clean build.
How long does it take to build a Plamax kit?
Roughly estimate: 2–6 hours for "straight build," 6–12+ hours if you also do panel lining, decals, and topcoat.
What is the difference between stickers and waterslide decals?
Stickers are fastest but can show at the edges. Waterslides look more painted, but require water, more patience, and preferably sealing with topcoat.
How do I avoid visible nub marks?
Cut in two steps (leave a little plastic, then trim), and sand gradually with finer grits. Finish with light polishing for an even sheen.
Frequently Asked Questions (FAQ)
Q: Do I need glue for Plamax kits?
A: Most often not. Many Plamax models are snap-fit (parts click together) and can be built completely without glue. However, a small amount of plastic cement can be useful if you want to lock a fit permanently, reinforce thin details, or if you plan to paint and want to minimize gaps. Start glue-free and use glue selectively only when you know you are satisfied with the posing and overall feel.
Q: How do I know which difficulty level suits me when shopping at Nerdbutiken.se?
A: Look at factors such as the number of parts, the amount of small details, decals, and how advanced the joints/inner-frame are. As a rule of thumb: if you want a safe start, choose a kit that feels “display-ready” straight out of the box and complement it with basic tools. If you are an experienced builder, you can choose more complex kits and plan for panel lining, decals, and topcoat. Also use stock status (in stock/pre-order) to plan your next build.
Q: How long does it take to build a Plamax model?
A: Roughly estimate 2–6 hours for a pure snap-fit build, and 6–15+ hours if you add panel lining, decals, and topcoat. What often takes the most time (but yields the most results) is sanding nub marks and achieving a smooth surface finish. A good tip is to divide the build: body/legs one evening, arms/weapons another, and finish on the weekend.
Q: What is the difference between stickers and waterslide decals – and which should I choose?
A: Stickers are the fastest: just peel and stick, but they can have visible edges. Waterslides give a more painted look but require water, a little patience, and preferably a seal with topcoat for durability. If you want the "most professional" result with reasonable effort: choose waterslides + matte topcoat (or glossy if you want more shine).
Q: How do I avoid visible “nub marks” (marks from the sprue)?
A: Do not cut flush directly. Use the two-step method: first cut off the part with a little plastic remaining, then trim close to the surface with sharp nippers or a hobby knife. Finish with sanding sticks in several grits (e.g., 600 → 1000 → 2000). On dark plastic, a light topcoat can help even out differences in shine.
Q: What do “pre-order”, “in stock” and “back-ordered” mean on Nerdbutiken.se?
A: In stock means it can usually be shipped quickly. Pre-order secures your copy before release – extra important as popular Plamax kits often sell out early. Back-ordered means the product is currently out of stock and the delivery date may be uncertain. Unique tip: gather several items in the same order (kit + tools + topcoat) to optimize shipping and get everything you need at once.
Q: What is the fastest way to get a nice finish as a beginner?
A: Go for the "3-step finish": 1) build cleanly and sand nub marks, 2) do simple panel lining to enhance details, 3) finish with matte topcoat for a uniform, premium impression. This requires relatively few products, gives a great visual effect, and is perfect to buy together with your kit at Nerdbutiken.se.
Next step: build, improve, and buy Plamax smart in Sweden
Plamax combines building enjoyment, high level of detail, and poseability in a way that makes the model often feel "display-ready" straight out of the box – while you can significantly enhance the overall result with simple tricks like panel lining, decals, and a protective topcoat. If you choose kits according to difficulty, scale, and the time you actually have, you'll find a hobby that suits both beginners and experienced builders. And it's precisely this "custom-built collector's value" – that you yourself create the final result – that makes Plamax extra rewarding compared to pre-assembled figures.
If you want to get started right away: choose a kit at the right level, add a small basic package with nippers, knife, and sanding tools, and try a first finish (panel line + topcoat). For a safe purchase with clear product info, smooth delivery, and easy handling of stock status and pre-orders, check out Nerdbutiken.se and monitor upcoming releases so you don't miss your next Plamax favorite.